
Importing your cap table
Bring an existing cap table into Tenacap from Carta, Pulley, or a spreadsheet. Every figure is reconciled against your source’s own report, and you see exactly what will be created — before a single record is committed.
Importing is how most founders coming from another platform get started. You upload one file, Tenacap parses it, and you review a full preview — stakeholders, share classes, securities, totals, and any exceptions — before anything is written. The import runs through the same engine as the rest of the product, so an imported cap table is indistinguishable from one built by hand. For the bigger picture of your first session, see Getting started.
Supported sources
Three sources are offered on the import screen, and all three work today.
- Carta — a cap-table
.xlsx, or a.zipthat also includes a contacts file for stakeholder emails. - Pulley — a single
.xlsxworkbook. - Tenacap CSV — for cap tables that live in a spreadsheet (not Carta or Pulley). Pick this source and download the CSV template, then fill in one row per holding — a column tells us each row’s type (Common, Preferred, SAFE, Note, Option/ISO/NSO, or Warrant). Columns: Stakeholder, Email, Security Type, Share Class, Quantity, Price Per Share, Investment, Valuation Cap, Discount, Interest Rate, Maturity Date, Plan, Expiration Date, Vesting Months, Cliff Months, Vesting Start, Issue Date. For a convertible note, Investment is the principal (Interest Rate / Maturity Date optional → 0% and issue+2yr). For an option grant, Price Per Share is the strike and the grant draws from the named Plan; add Vesting Months (+ optional Cliff Months / Vesting Start) for a standard monthly schedule. Warrants take a strike (Price Per Share) and an Expiration Date. Already keep your cap table in a spreadsheet with different column names? You don’t have to reformat it — upload your file as-is and a mapping step lets you match your columns to ours (we pre-fill the obvious ones). It round-trips with Tenacap’s CSV export, so export → edit → re-import works too; see Export & open schema.
Producing your export
Each platform tucks its export in a slightly different place.
From Carta: go to Essentials, open View cap table, then Export. In the export dialog choose Detailed, set the “As of” date, and export to Excel. Grab the file from your Downloads. Carta’s OCX / Open Cap Table export also works and is the most robust if you have it. To include stakeholder emails, add Carta’s “Shareholder Information” export — drop it in the optional contacts box when you upload, or zip both files together.
From Pulley: go to Reports, open Cap Table, and choose Download as Excel.
Uploading your file
Start a new import from your workspace home. Pick your source, then drag your file onto the upload area or click to browse. Tenacap accepts .xlsx and .zip files up to 50 MB; exports for companies below Series C fit comfortably under that.
Exports don’t carry a few company facts Tenacap needs, so you’ll also enter the incorporation date, jurisdiction, and entity type (the legal name is auto-extracted if you leave it blank). When you continue, your file uploads and parses, then you land on the preview.

Reading the preview
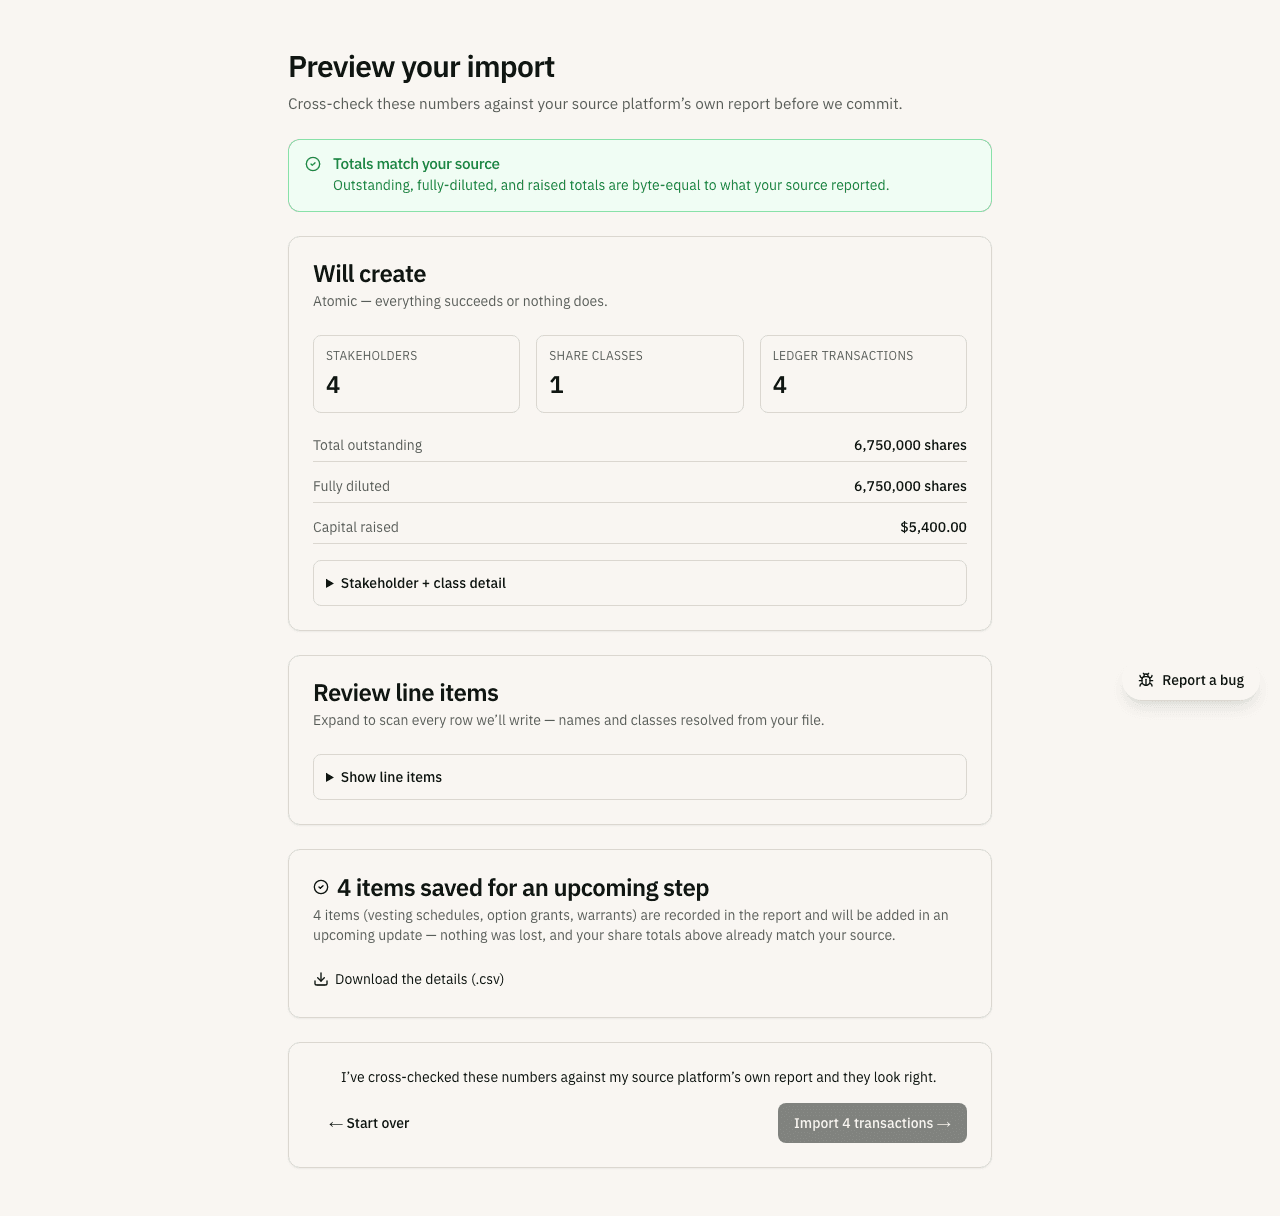
The preview is the heart of the import. Nothing has been written yet — this is a dry run that replays your file against an empty cap table and totals up the result.
At the top is the trust check: Totals match your source when Tenacap’s outstanding, fully-diluted, and capital-raised figures are exactly equal to the numbers your source reported. If they disagree, the screen shows each mismatched figure side by side and the import will not commit. Below that, a “Will create” card breaks down how many stakeholders, share classes, and ledger transactions will be added, with totals you can read straight off the card.
The preview also reports email coverage — how many of the incoming stakeholders have an email address on file. Carta and Pulley exports usually omit emails, so if the count is low, add Carta’s contacts file on the upload step (or fill emails in afterward) — emails are what let you invite holders to the portal and send them notices.
Reviewing line items
The totals check answers “do the aggregates match?” The Review line items card answers “is every individual row right?” Expand it to see each transaction the import will write — its type, effective date, the stakeholder and share class (resolved from your file’s own references, not raw codes), the quantity, and the price or consideration. It’s the same data the commit step writes, shown row by row so you can spot a misattributed holding or a wrong class before anything is committed. The list loads on demand when you open it, so a large cap table doesn’t slow the preview down.
The exception report
Anything Tenacap can’t bring in as-is is listed as an exception, never silently dropped. Exceptions come in two flavors. Deferred items — such as vesting schedules, option grants, and warrants — are captured in the report and will be added automatically in a later update; your share totals already match your source without them. A small number of unsupported items can’t be represented yet and need a closer look.
You can download the full exception report as a CSV from both the preview and the post-import screen, so you always have a record of what was set aside.
Committing the ledger
When the totals match, check the box confirming you’ve cross-checked the numbers, then commit. Everything is written in a single atomic transaction — the company, every stakeholder, every share class, and every issuance all succeed together, or nothing is written at all. Re-running the same import is a no-op, so a network blip mid-commit won’t double-import your cap table.
What to verify after
Open your new cap table and confirm the fully-diluted totals match the numbers you cross-checked in the preview. Then open the exception report and record by hand anything that was set aside (an unrecognized row, a value we couldn’t map). Once those are in, your cap table is complete and ready to share through the stakeholder portal.